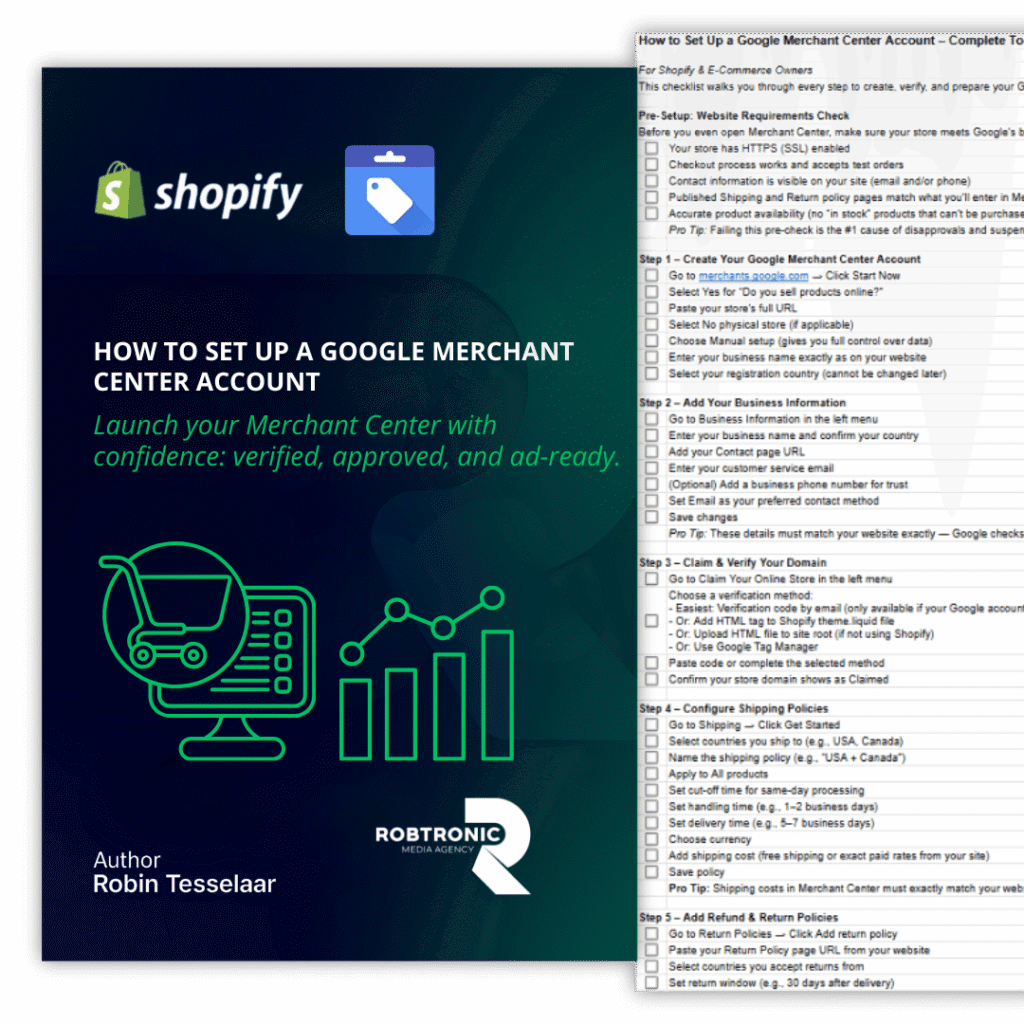
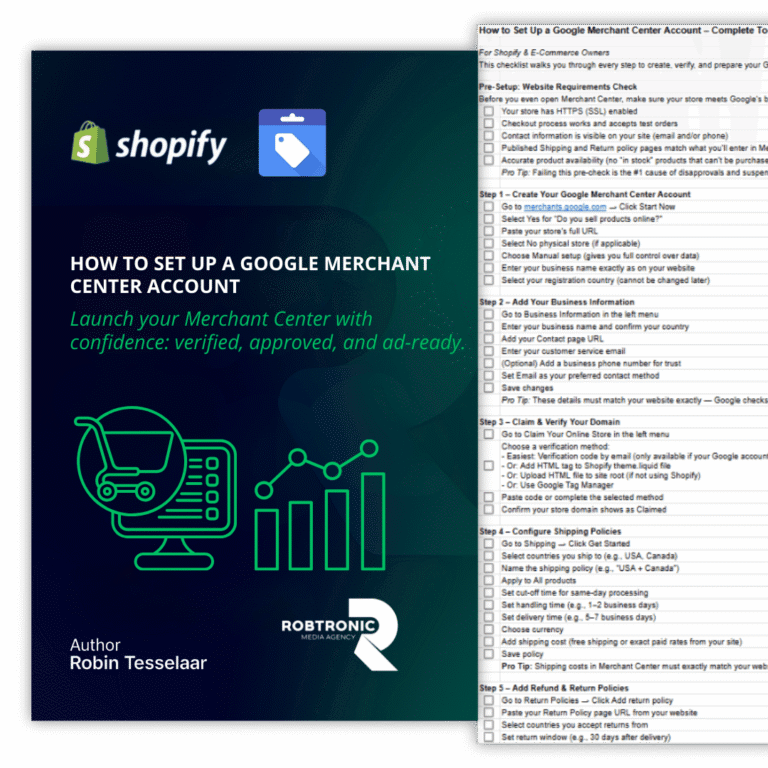
Step 4: Shipping settings (delivery times and costs)
Countries and rates
In the video, you:
- Go to Shipping
- Click Get started
- Select the countries you ship to (example: US + Canada)
- Name the policy (example: “USA + Canada”)
- Apply to all products
Delivery time basics
Merchant Center calculates delivery estimates using:
- Cut-off time
- Handling time
- Transit time
The video example uses:
- A cut-off time (with a selected time zone)
- Handling days (example: 1–2 business days, Mon–Fri)
- Transit time (example: 5–7 days)
Free shipping setup
If your website offers free shipping, select free shipping in the Merchant Center too. The big rule: your Merchant Center shipping setup must match what your website promises. (Experience-based; mismatch risk is high.)
Step 5: Return policy setup
Return window and processing time
In the video flow, you:
- Go to Shipping and returns → Return policies → Add return policy
- Paste your return policy page URL
- Select countries
- Choose whether you accept returns (defective + non-defective) and exchanges
- Set the return window (example: 30 days after delivery)
- Set return method (example: by mail)
- Choose currency
- Confirm restocking fee and refund processing time (example: 10 days)
- Save
Exchanges
If you accept exchanges on your website, set it the same way in the Merchant Center.
Match website policy page
Google’s own guidance calls out consistency between your website and Merchant Center return policy details.
What happens next: your return policy can show a status like Pending, Verified, or Rejected inside the Merchant Center.
Tax settings (US only)
This is in the checklist, but not covered in the 7-minute video steps.
- If you sell in the US, you may need to configure tax settings so your pricing stays consistent.
- Needs verification: exact UI path/labels for tax settings in the current Merchant Center UI.
Optional: Branding and free listings
This expands what you set up after the video.
Logo basics
Upload a clean logo that matches your store branding. (Experience-based.)
Free listings note (no guarantees)
Free listings can be enabled, but products are not guaranteed to show. Google says it relies on the data you provide to match products to searches.
Next: Connect your store and product feed
Shopify connection paths
This step is mentioned at the end of the video as the “next” move (covered in the follow-up video).
Post-sync checks
After products sync:
- Check product status and policy warnings (see Final checks below).
- Fix high-impact issues before spending on ads. (Experience-based.)
Final checks: diagnostics and common warnings
Diagnostics routine
In 2026 UI terms, you’ll usually look at:
- Products → Needs attention (this replaced the older “Diagnostics” view)
Common setup mistakes
Here are the mistakes that cause the most pain later:
- Shipping times/costs in Merchant Center don’t match your shipping page
- Return policy details don’t match your returns page
- Domain not claimed (or claimed under the wrong user)
- You remove the user who verified the site and lose verification (yes, this can happen)
Troubleshooting / decision rules (IF/THEN)
- IF “Needs attention” shows shipping issues, THEN compare Merchant Center shipping policy vs your shipping page and make them match.
- IF return policy status is “Rejected,” THEN fix your website policy page first, then update the policy in Merchant Center and resubmit.
IF you need to add a freelancer/agency, THEN use Access and services → People and access → Add person (steps below).
How to give access to Merchant Center (so someone can help)
Google’s current help flow is:
- Go to Access and services
- Open the People and access tab
- Click Add person
- Enter email and choose access level (Admin / Standard, etc.)
- Save
FAQ
Is Merchant Center free?
Creating a Merchant Center account is free. Extra guidance → Google Help.
Do I need Merchant Center to run Shopping ads in Google Ads?
Yes—Merchant Center is where your product data lives for Shopping ads. Extra guidance → Google Help.
Do I still need Merchant Center if I do not run ads?
If you want free product listings, Merchant Center is still relevant. Just remember: opt-in doesn’t guarantee visibility. Extra guidance → Google Help.
What are the Merchant Center requirements for my website?
At minimum, your store should clearly show contact info, shipping, and returns—and your Merchant Center settings should match what your site says. Extra guidance → Google Help.
How do I verify and claim my website?
Use an allowed verification method (email, platform, HTML tag/file, Tag Manager, Analytics), then complete the claim step. Extra guidance → Google Help.
Why can’t my website be verified?
Common causes: you can’t receive the email code, you don’t have admin access to the verification method, or your platform requires a different method (for Shopify, HTML tag is often recommended). Extra guidance → Google Help.
How do shipping settings work?
Delivery estimates are based on cut-off time, handling time, and transit time. Extra guidance → Google Help.
How to give access to Merchant Center?
Use Access and services → People and access → Add person, then assign the right access level. Extra guidance → Google Help.
After Final checks
If your Merchant Center is set up and you want a safe launch system for your first profitable campaigns, the next step is Google Ads Foundation Strategy Training.